Jetpack Compose: Custom Google Map Marker | Erselan Khan
Today we will show you how we can make Custom Google Map Marker using Jetpack Compose. But before moving forward, I would like to ask you to please follow my medium account to get the latest updates about Android and other tech-related topics.

Jetpack Compose:
Jetpack Compose is Android’s modern toolkit for building native UI. It simplifies and accelerates UI development on Android. Quickly bring your app to life with less code, powerful tools, and intuitive Kotlin APIs.
Want to check spelling mistakes on your documents? download Spelling Checker from the Play Store.
Sometimes we need to add a custom marker on our Google Maps. Let’s start code and see how we can do this using Jetpack Compose:
First of all, we need to add some dependencies for Google Maps:
dependencies {
    implementation "com.google.maps.android:maps-compose:1.0.0"
    implementation "com.google.android.gms:play-services-maps:18.0.2"
}
Now we need to add the API key in our AndroidManifest.xml file:
<application
    android:allowBackup="true"
    android:icon="@mipmap/ic_launcher"
    android:label="@string/app_name"
    android:roundIcon="@mipmap/ic_launcher_round"
    android:supportsRtl="true"
    android:theme="@style/Theme.Compose">
    <activity
        android:name=".MainActivity"
        android:exported="true"
        android:label="@string/app_name"
        android:theme="@style/Theme.Compose">
        <intent-filter>
            <action android:name="android.intent.action.MAIN" />

            <category android:name="android.intent.category.LAUNCHER" />
        </intent-filter>
    </activity>

    <meta-data
        android:name="com.google.android.geo.API_KEY"
        android:value="AIza*************************"/>

</application>
Jetpack Compose provides us GoogleMap() function, by using this we can easily show Google Maps on our screen:
val markerPosition = LatLng(1.35, 103.87)
val cameraPositionState = rememberCameraPositionState {
    position = CameraPosition.fromLatLngZoom(markerPosition, 15f)
}
GoogleMap(
    modifier = Modifier.fillMaxSize(),
    cameraPositionState = cameraPositionState
) {
    Marker(
        position = markerPosition,
        title = "Your Title",
        snippet = "Place Name"
    )
}
We are showing the marker by using the Jetpack Compose Marker() function. We are setting the modifier as fillMaxSize(), so the map takes the whole screen and we are also setting the map camera position to our marker location. The output will look like this:

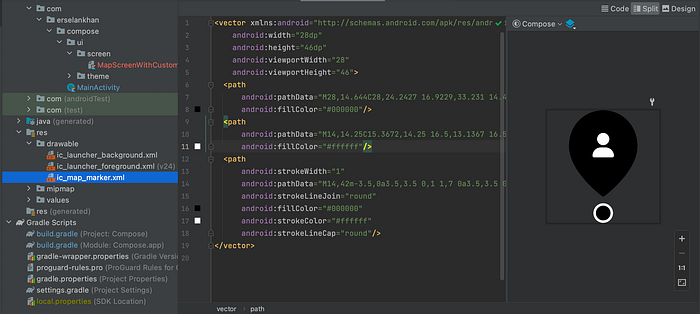
Now we need to replace this default marker with our own custom marker. So, First, we need to add our custom marker inside our drawable folder like the below:
Now we are creating a Composable function for showing markers on a map, which we call as MapMarker
@Composable
fun MapMarker(
    context: Context,
    position: LatLng,
    title: String,
    @DrawableRes iconResourceId: Int
) {
    val icon = bitmapDescriptorFromVector(
        context, iconResourceId
    )
    Marker(
        position = position,
        title = title,
        icon = icon,
    )
}
MapMarker takes four parameters:
- Context
- Marker Position
- Marker Title
- Custom Icon for Marker
The Jetpack Compose Marker()the the function takes the icon as a BitmapDescriptor object. So we need to convert our drawable icon into a BitmapDescriptor object. We have created a function for this, which we call as bitmapDescriptorFromVector().
fun bitmapDescriptorFromVector(
    context: Context,
    vectorResId: Int
): BitmapDescriptor? {

    // retrieve the actual drawable
    val drawable = ContextCompat.getDrawable(context, vectorResId) ?: return null
    drawable.setBounds(0, 0, drawable.intrinsicWidth, drawable.intrinsicHeight)
    val bm = Bitmap.createBitmap(
        drawable.intrinsicWidth,
        drawable.intrinsicHeight,
        Bitmap.Config.ARGB_8888
    )

    // draw it onto the bitmap
    val canvas = android.graphics.Canvas(bm)
    drawable.draw(canvas)
    return BitmapDescriptorFactory.fromBitmap(bm)
}
Now just replace the Marker function with MapMarker function:
val markerPosition = LatLng(1.35, 103.87)
val cameraPositionState = rememberCameraPositionState {
position = CameraPosition.fromLatLngZoom(markerPosition, 15f)
}
GoogleMap(
modifier = Modifier.fillMaxSize(),
cameraPositionState = cameraPositionState
) {
MapMarker(
position = markerPosition,
title = "Your Title",
context = LocalContext.current,
iconResourceId = R.drawable.ic_map_marker
)
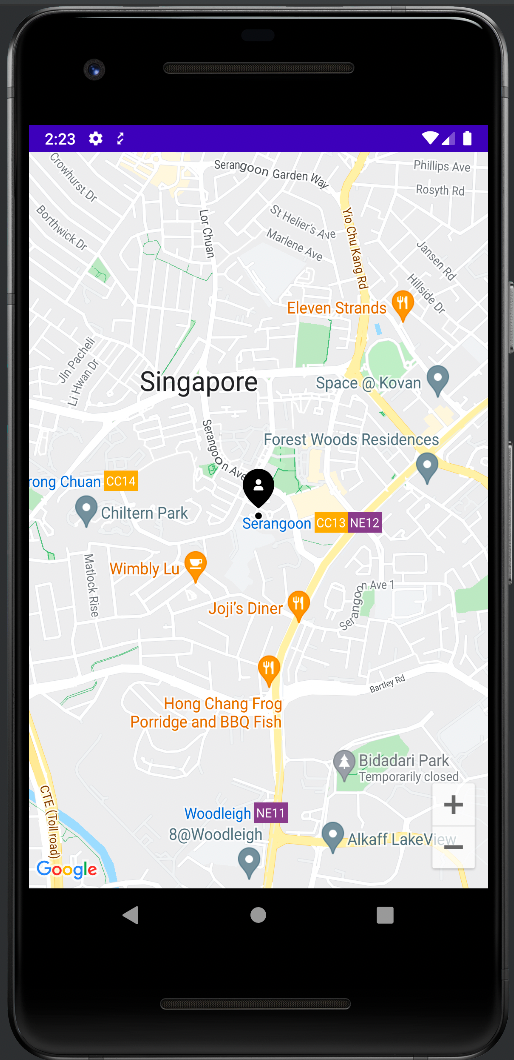
}After all the above changes, run the app, it should look this:
That’s it for now. I will cover more topics on Android, Java, Kotlin, and Springboot in my upcoming articles. If you like this article then Clap as much as you can 🤐
In case you missed: 🤐
- https://towardsdev.com/parallel-multiple-api-calls-or-network-calls-using-kotlin-coroutines-40cb5f313171
- https://towardsdev.com/kotlin-%EF%B8%8F-constructors-erselan-khan-984a5af2cac2
- https://medium.com/bazaar-tech/dynamically-update-refresh-reload-viewpager2-fragments-588fcbd6f859
Show your love by sharing this article with your fellow developers or Buy me a pizza by clicking this link https://www.buymeacoffee.com/erselankhan.
(Again, the source for this demo is on https://github.com/arsalankhan994/jetpack-compose-step-by-step. Follow me for more content about Android, Kotlin, and other technologies. If you have any questions, go ahead and ask me here or email me at arsalankhan994@gmail.com and I’ll do my best to respond.)

